我们开始制作第一个路由页面——“发现”页面。在开始制作页面之前,我们需要先分析一下页面上的内容,看看这个页面上有什么内容,这些内容是怎么摆放的。
页面分析
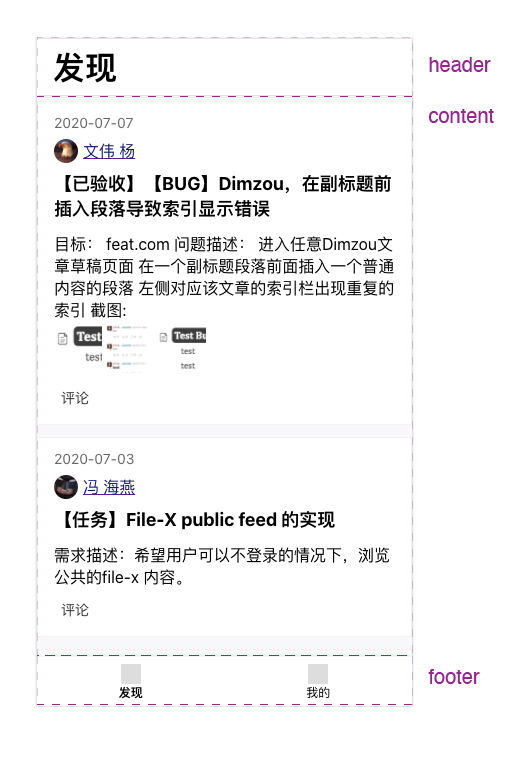
在开始编码之前,我们先查看一下“设计稿”。
从布局上来讲,我们可以将“发现”页面的内容分为三部分,“头部(页面标题)”、“内容(事件列表)”,“底部(页面导航)”。
从内容上来讲,中间是个事件列表。我们需要调用 File-X API 来获取数据,并在页面中进行渲染
处理页面布局
接下来,我们先从页面布局入手,开始我们的页面制作。
确定页面的三段式基本结构
打开 src/Explore.js ,清理之前的“占位组件内容”,然后开始入手页面布局相关的代码:
function Explore() {
    return (
        <div className='App'>
            <div className='App__header'>
                <h1 className='PageTitle'>发现</h1>
            </div>
            <div className='App__content'>
                Content
            </div>
            <div className='App__footer'>
                Footer
            </div>
        </div>
    )
}
然后在 index.css 添加页面css样式。
这里我们没有为 Explore 组件,新建一个专有的css文件。因为这个页面布局在“我的”页面上也有出现。为了复用起来比较简单,我们直接将“发现”页面的布局样式写在了index.css上面。
/* 布局 */
.pl_12,
.px_12 {
  padding-left: 12px;
}

.pr_12,
.px_12 {
  padding-right: 12px;
}

.pl_16,
.px_16 {
  padding-left: 16px;
}

.pr_16,
.px_16 {
  padding-right: 16px;
}

/* 页面 */
.App {
  display: flex;
  flex-direction: column;
  width: 100vw;
  height: 100vh;
  overflow: hidden;
}
.App__content {
  flex: 1;
  overflow: auto;
}
.App__header,
.App__footer {
  flex-shrink: 0;
}

.PageTitle {
    margin-top: 0;
    margin-bottom: 0;
}
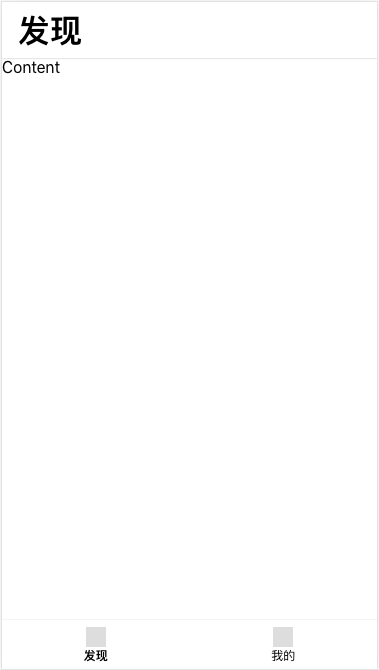
编辑完成之后,效果如下图所示,我们已经可以看到基础的三段式结构了。

底部导航
接下来我们要编辑底部导航组件。这个底部导航组件有两个链接,一个是链接到“发现”页面的,一个是链接到“我的”页面的。当链接所对应的页面与当前访问页面一致时,链接的文本有加粗的效果。
“链接激活时,文字变成粗体”,这个效果我们将会使用css类名来控制,当链接处于激活状态时,给链接加一个 is-active 的类名,然后在 is-active 下面编写对应的样式。为了方便设置元素的类名,我们需要安装一个依赖包classnames。
$ npm install classnames -S新建文件 src/BottomBar.js ,并编辑
import React from 'react'
import classNames from 'classnames'
import { withRouter } from 'react-router-dom';
import './BottomBar.css';

function BottomBar (props) {
  const {
    location: { pathname },
    history: { push }
  } = props

  return (
    <div className="BottomBar">
      <div
        className={classNames("BottomBar__item", {
          'is-active': pathname === '/explore'
        })}
        onClick={() => {
          if (pathname !== '/explore') {
            push('/explore');
          }
        }}
      >
        <span className="BottomBar__icon">

        </span>
        <span className="BottomBar__label">
          发现
        </span>
      </div>
      <div
        className={classNames("BottomBar__item", {
          'is-active': pathname === '/me'
        })}
        onClick={() => {
          if (pathname !== '/me') {
            push('/me');
          }
        }}
      >
        <span className="BottomBar__icon">
        </span>
        <span className="BottomBar__label">
          我的
        </span>
      </div>
    </div>
  )
}

export default withRouter(BottomBar)
新建 src/BottomBar.css 并写入样式
.BottomBar {
    display: flex;
    box-sizing: border-box;
    height: 50px;
    padding-top: 5px;
    padding-bottom: 5px;
    border-top: 1px solid #f4f4f4;
    background-color: white;
}

.BottomBar__item {
    flex: 1;
    height: 100%;
    text-align: center;
    display: flex;
    flex-direction: column;
    align-items: center;
}
.BottomBar__icon {
    display: inline-block;
    width: 20px;
    height: 20px;
    background: #ddd;
    margin-top: 2px;
}
.BottomBar__label {
    margin-top: auto;
    font-size: 12px;
}

.is-active .BottomBar__label {
    font-weight: bold;
}
完成并访问 http://localhost:3000/explore ,效果如下图:

调整头部样式
现在页面头部上已经显示有页面名称了,但是高度、边界等样式还需要调整。接下来我们重新调整一下头部的代码以及样式。
打开并编辑 src/Explore.js
<div className="App__header">
    <div className="PageHeader">
        <h1 className="PageTitle pl_16">发现</h1>
    </div>
</div>
编辑 src/index.css,插入一下代码
.App__header {
  background-color: white;
  box-shadow: 0 0 2px rgba(0, 0, 0, .3);
  z-index: 10;
  position: relative;
}

.PageHeader {
  height:56px;
  display: flex;
  align-items: center;
}
编辑完成后,得到的效果如下图所示:
获取页面数据
页面的布局已经基本完成了。接下来,我们尝试获取调用 Feat File-X API 来获取数据。我们将要调用的API是:Feed: xfileItems。想查阅更多关于 File-X 的API 可以访问: File-X API 参考
我们将会通过 React hook useEffect ,在组件加载完成时,向 Feat API 服务器发起请求。在 src/Explore.js中插入下面的代码
import { fetchPublicFeed } from './requests';

function Explore() {
    const [state, setState] = useState({
        loading: false,
        items: [],
        hasMore: true,
        next: null,
    });
    useEffect(() => {
        setState({
                ...state,
                loading: true,
            });
        fetchPublicFeed(state.next || {
            page: 1,
            page_size: 12,
        }).then(({ data, pagination }) => {
            setState({
                ...state,
                loading: false,
                next: pagination.next ? {
                    page: pagination.next,
                    page_size: pagination.page_size
                } : null,
                hasMore: !!pagination.next,
                items: [
                    ...state.items,
                    ...data,
                ]
            })
        }).catch((err) => {
            setState({
                ...state,
                loading: false,
                fetchError: err,
            })
        })
    }, []);

    console.log(state);
    // 原来的代码...
}
创建文件 src/requests.js ,把添加方法 fetchPublicFeed 。
我们准备将所有的 API 请求放入到
requests.js中,进行统计管理。
import { stringify } from 'qs'
const API_ENDPOINT = process.env.REACT_APP_FEAT_API_ENDPOINT;

const resHelper = (res) => {
    if (res.ok) {
        if (res.status === 204) {
            return res;
        }
        return res.json();
    }
    const contentType = res.headers.get('Content-Type');
    if (contentType === 'application/json' && res.json) {
        return res.json().then((data) => {
            const error = new Error(data.message);
            error.code = data.code;
            error.data = data.data;
            throw error;
        })
    } else if (res.text) {
        return res.text().then((info) => {
            const error = new Error(res.statusText)
            error.info = info;
            throw error;
        })
    } else {
        throw new Error(res.statusText);
    }
}

export const fetchPublicFeed = async (params) => {
    const query = params ? stringify(params) : '';
    const baseURL = `${API_ENDPOINT}/api/feed/xfile-items/`;
    const url = query ? `${baseURL}?${query}` : baseURL;
    const res = await fetch(url).then(resHelper);
    return res;
}
安装依赖包 qs
qs: A querystring parsing and stringifying library with some added security.
$ npm install qs --S这里我们使用了环境变量来设置 API 网站地址,所以需要新建一个名为 .env.local 的文本文件,并在里面填入 REACT_APP_FEAT_API_ENDPOINT 的设置
REACT_APP_FEAT_API_ENDPOINT=https://www.featapi.comENV的详细使用方式可查阅
create-react-app的官方文档:Adding Custom Environment Variables
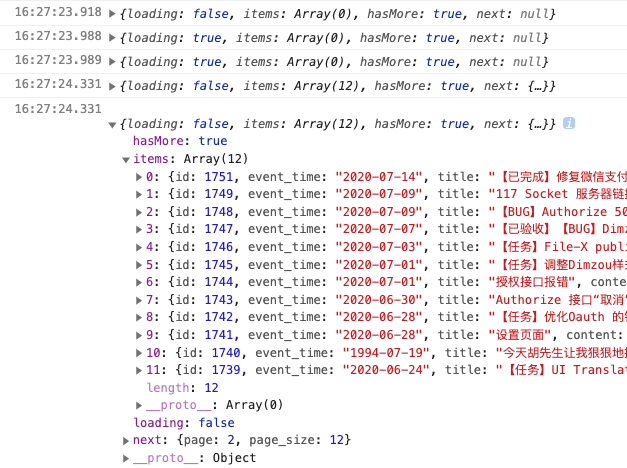
刷新 http://localhost:3000,打开浏览器的开发者工具,可以看到有组件 state 的输出。
展示页面数据
接下来,我们将获取到的数据显示出来。结合 state 的状态数据,页面主要的渲染逻辑大致如下:
if (loading) {
    return <LoadingHint />
}
if (hasFetchError) {
    return <FetchErrorInfo />
}
if (hasData) {
    return <ItemList />
}
打开 src/Explore.js,在 div.App__content 内进行修改
<div className='App__content'>
    {state.fetchError && <div>{state.fetchError.message}</div>}
    {state.loading && <div>加载中</div>}
    {state.items && !!state.items.length && (
        <div>
            {state.items.map((item) => (
                <div className='px_16 py_12' key={item.id}>
                    <h3>{item.title}</h3>
                    <div>{item.content}</div>
                </div>
            ))}
        </div>
    )}
</div>
编辑 index.css 添加布局样式
.pt_12,
.py_12 {
  padding-top: 12px;
}

.pb_12,
.py_12 {
  padding-bottom: 12px;
}

.pt_16,
.py_16 {
  padding-top: 16px;
}

.pb_16,
.py_16 {
  padding-bottom: 16px;
}
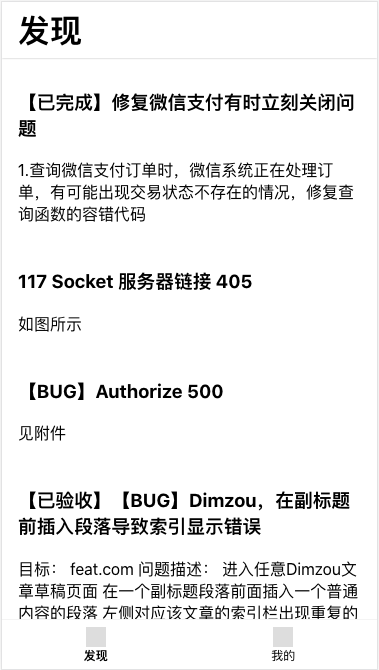
最后得到的效果如下图:
小结
来到这里,“发现”页面的基本功能已经完成了。这部分教程里面,我们主要描述了
- 如何分析一个页面的内容
- 如何做一个基本的页面布局
- 如何使用 fetch 向 Feat API 服务器获取数据
- 如何将一个数组的数据通过列表的形式展示出来
当然啦,这个页面还有许多地方需要我们去进行优化,比如:加载更多内容、下拉刷新,显示用户头像,以及事件样式的调整等。我们将会在下一部分继续对“发现”页面进行优化。